Photoshop is the go-to tool for graphic designers, photographers, and digital artists. However, it can be challenging to achieve professional-looking results without spending hours on each project. That’s where the Stable Diffusion Photoshop Plugin comes in handy. This plugin enhances your images by adding a soft focus effect that creates a dreamy look. It also helps reduce noise and sharpens edges, making your photos more vibrant and eye-catching. In this article, we’ll explore how you can use Stable Diffusion and ImageFlash plugins to improve your Photoshop workflow and create stunning visuals in less time.
In the world of graphic design and photo editing, having efficient tools can make a world of difference. Today, we introduce two powerful plugins, Stable Diffusion and ImageFlash, that can take your Photoshop experience to new heights. In this blog post, we will explore the benefits of using these plugins, compare their latest features, and delve into the advantages of ImageFlash over other plugins.
Stable Diffusion Photoshop Plugin
Gone are the days of spending hours manually adjusting and fine-tuning your images. With the Stable Diffusion Plugin, you can effortlessly achieve remarkable results with just a few clicks. Its intuitive interface allows you to easily navigate through its array of features and create stunning visuals with minimal effort.
How to get started with Stable Diffusion Photoshop Plugin
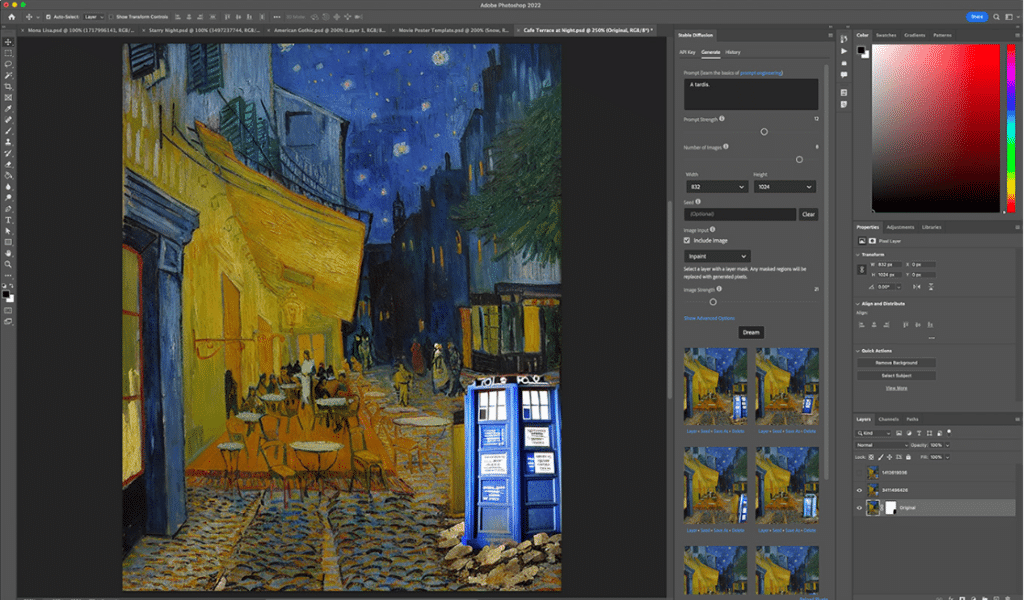
To get started, simply download the plugin file from the official website and follow the hassle-free installation process. Once installed, open Adobe Photoshop and load the Stable Diffusion Plugin.
With its seamless integration, you’ll be amazed at how quickly you can enhance your images and bring your creative visions to life.
The Stable Diffusion Plugin brings new possibilities to your digital artistry. Its automatic AI-driven algorithms intelligently analyze your images, making precise adjustments to improve overall quality and clarity.
In the upcoming sections of this blog article, we will explore the various benefits, usage instructions, and performance analysis of the Stable Diffusion Plugin. We will also discuss alternative plugins and explore how Image AI’s ImageFlash works. So, buckle up and get ready to unleash the full potential of your creativity with the Stable Diffusion Photoshop Plugin. Stay tuned for more exciting insights and creative techniques in our journey ahead.
How to add Stable Diffusion in Photoshop?
To add Stable Diffusion in Photoshop, you can follow these steps:
1. Open Photoshop on your computer.
2. Load the image you want to apply Stable Diffusion to by going to File > Open.
3. Ensure that the layer you want to apply the effect to is selected in the Layers panel.
4. Go to the top menu and choose Filter > Stylize > Diffuse.
5. In the Diffuse dialog box that appears, select “Anisotropic” from the dropdown menu. This option provides a more stable diffusion effect.
6. Adjust the “Mode” slider to control the strength of the diffusion effect. Moving it towards the right increases the diffusion.
7. If desired, you can also adjust the “Angle” slider to change the direction of the diffusion effect.
8. Preview the changes by checking the “Preview” box in the dialog box.
9. Once you are satisfied with the settings, click “OK” to apply the Stable Diffusion effect to your image.
10. You can further fine-tune the effect by adjusting the opacity or blending mode of the applied Diffuse filter layer.
By following these steps, you will be able to add Stable Diffusion to your images in Photoshop. This effect can help to smooth out details and create a more diffused appearance in your photos.
Explaining the Benefits of Stable Diffusion Plugin
The Stable Diffusion Photoshop plugin is an invaluable tool for any professional or enthusiast using Adobe Photoshop. This plugin has quickly gained popularity in the Photoshop community due to its impressive capabilities and numerous benefits.
One of the major advantages of the Stable Diffusion plugin is its ability to add a new level of depth and dimension to your images. With just a few simple clicks, this plugin can transform a flat, lifeless image into a captivating masterpiece. By applying the stable diffusion effect, your photos will come alive with vibrant colours and enhanced details, creating a visual impact that is sure to leave a lasting impression.
Furthermore, the Stable Diffusion plugin is incredibly easy to install and use. With a seamless integration into the Photoshop interface, you can effortlessly access this powerful tool and begin transforming your images instantly. Whether you are a seasoned Photoshop user or a beginner, this plugin offers an intuitive and user-friendly experience, allowing you to unleash your creativity without any technical hurdles.
Another noteworthy benefit of the Stable Diffusion plugin is its unmatched performance and quality. This plugin utilizes advanced algorithms and AI technology to ensure optimal results. The stability of the diffusion effect is maintained throughout the editing process, guaranteeing professional-grade output every time.
In conclusion, the Stable Diffusion Photoshop plugin is a game-changer for anyone looking to take their image editing skills to the next level. With its ability to effortlessly add depth and dimension to your photos, ease of use, and exceptional performance, this plugin is a must-have for all Photoshop users. Download, install, and experience the powerful benefits of the Stable Diffusion plugin today, and unlock the true potential of your images.
How to Use the Stable Diffusion Plugin in Photoshop
To fully harness the potential of the Stable Diffusion Photoshop Plugin, it is imperative to understand how to use it effectively. With a few simple steps, you can create striking and professional-looking images that will leave a lasting impression on viewers.
1 step:
First, ensure that you have downloaded and installed the Stable Diffusion plugin on your Adobe Photoshop software. Once installed, you can access the plugin by clicking on the “Plugins” tab in the Photoshop interface.
2 step:
To load an image into the Stable Diffusion plugin, go to the “File” menu and select “Open.” Choose the desired image file and click “Open.” The image will now appear within the Stable Diffusion plugin window.
3 step:
Next, take advantage of the various options available in the plugin to enhance and manipulate your image. You can create automatic adjustments by clicking on the “Automatic” tab, which provides quick and efficient enhancements based on the image’s characteristics. Get to know more about Stable Diffusion Photoshop Plugin, here.
Useful Tips:
- For more precise adjustments, navigate to the “Diffusion” tab. Here, you can modify the diffusion settings to achieve the desired effect.
- Experiment with the various sliders and settings to add depth, texture, and richness to your image.
Once you are satisfied with your edits, click on the “Apply” button to save the changes. - You can also choose to save the modified image as a new file or replace the original file.
- By following these straightforward steps, you can master the Stable Diffusion Photoshop Plugin and unlock its potential to create stunning images.
Whether you are a professional photographer or a design enthusiast, this plugin is sure to become an indispensable tool in your creative arsenal.
Alternative to Stable Diffusion Photoshop: ImageFlash
Are you craving AI-generated images but hesitant to download additional software like Photoshop? Look no further! ImageFlash allows you to create stunning visuals without any extra downloads or fees. Best of all, it’s completely free! Here’s how it works:

Imagine a visual in your mind and convey it to ImageFlash with just one concise statement. Our enchanted pen will take care of the rest, eliminating any need for you to worry about enhancing your prompt. With neuroflash, optimizing your prompt becomes effortless as it automatically enhances it on its own accord resulting in even more impressive outcomes.
Now, just decide how many pictures you want the AI to produce, up to a maximum of four. The advanced technology behind our platform will analyze your request and generate stunning results that meet all your needs. You have complete freedom over what you do with these images – save them for later use or share them instantly! Plus, there’s no need to worry about copyright infringement because every picture created by our software is entirely free from any legal restrictions.
Don’t let limited resources hold back your creativity anymore; start generating unique and royalty-free images today without spending a dime on subscriptions or licenses. With ImageFlash at hand, nothing can stop you from unleashing the full potential of imagination in visual form!
Frequently asked questions
How do I install stability in Photoshop?
To install stability in Photoshop, you can follow these steps. First, ensure that you have a stable and reliable computer system. Make sure your hardware meets the minimum requirements specified by Adobe for running Photoshop smoothly. Next, download the latest version of Photoshop from the official Adobe website. Check for any available updates or patches for the software and install them. These updates often include bug fixes and performance improvements that contribute to stability. Additionally, consider freeing up disk space on your computer. Photoshop requires a considerable amount of space to run efficiently, so deleting any unnecessary files or applications can help improve stability. It’s also advisable to close any other programs or applications running in the background while using Photoshop. This will minimize potential conflicts and ensure that Photoshop has sufficient resources to operate smoothly. Another useful tip is to regularly clean up the Photoshop cache, especially if you’re receiving messages that your scratch disks are full. Go to the Preferences menu in Photoshop, select the “Performance” tab, and click on the “Purge” button. This will remove any temporary files and clear up memory, enhancing stability. Lastly, keep your operating system up to date. Install updates and patches for your OS to ensure compatibility with Photoshop and optimize overall system performance. Following these steps should help you install stability in Photoshop and ensure a more smooth and reliable experience while using the software.
How to install plugin in Photoshop 2023?
To install a plugin in Photoshop 2023, you need to follow a few simple steps. First, make sure you have downloaded the plugin file from a trusted source. Once you have the plugin file ready, open Photoshop. Next, go to the “Edit” menu at the top of the screen and select “Preferences”. From the dropdown menu, choose “Plugins”. This will open the Plugin Preferences window. Look for the “Additional Plugins Folder” option and click on the “Choose” button next to it. A window will appear where you can navigate to the folder where you saved the plugin file. Select the plugin file and click “OK”. Photoshop will then install the plugin and you will see a confirmation message. To activate the plugin, you may need to restart Photoshop. Once it restarts, you can access the plugin through the “Filter” menu or any other relevant menu, depending on the type of plugin you installed. It’s important to note that not all plugins are compatible with each version of Photoshop, so double-check the compatibility before downloading a plugin. Also, ensure that you only download plugins from reputable sources to avoid any security risks. By following these steps, you should be able to successfully install and use plugins in Photoshop 2023, enhancing your editing capabilities and expanding your creative options.
What is the AI plugin for Photoshop?
The AI plugin for Photoshop is a powerful tool that enhances the capabilities of Adobe Photoshop by incorporating artificial intelligence techniques. With this plugin, users are able to leverage the power of AI algorithms to perform various sophisticated tasks within the Photoshop environment. One of the key features of the AI plugin is its ability to perform automatic image tagging and categorization. By analyzing the visual content of an image, the AI plugin can intelligently tag and classify objects, scenes, and even emotions depicted in the image. This not only helps users organize their image libraries more efficiently but also enables faster and accurate searching. In addition to image tagging, the AI plugin also provides advanced image editing capabilities. It can automatically detect and remove unwanted objects or blemishes from photos, saving users significant time and effort. The plugin also offers intelligent image enhancement and retouching tools, which can automatically adjust colors, lighting, and other aspects of an image to achieve optimal results. Furthermore, the AI plugin enables users to generate realistic and high-quality image effects, such as applying artistic styles or transforming photos into impressive paintings. By leveraging AI algorithms, the plugin understands the content of the image and intelligently applies appropriate effects, resulting in stunning visuals. Overall, the AI plugin for Photoshop offers a range of intelligent features that greatly enhance the capabilities of the software. By incorporating artificial intelligence, it provides users with powerful tools to automate various tasks, improve image editing workflows, and achieve professional-looking results with ease.
Conclusion
In conclusion, the Stable Diffusion Photoshop Plugin is a powerful tool that brings numerous benefits to your image editing workflow. We have explored its advantages, learned how to use it effectively in Photoshop, and analyzed its performance and quality. With Stable Diffusion Plugin, you can achieve stunning results and enhance your creative projects. While there are alternatives like Image AI, none can match the precision and versatility of Stable Diffusion.
Additionally, ImageFlash offers a unique approach to image enhancement. We hope this blog post has sparked your interest in exploring more about Stable Diffusion and other exciting topics in our future blogs. Keep reading and discovering new ways to elevate your photo editing skills!